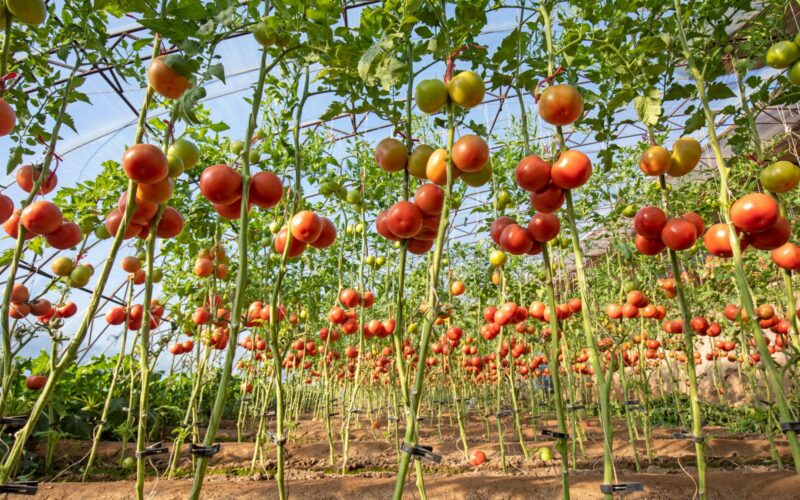
Category: Gardening Hacks

  • Garden Tool Organization Ideas for Small Sheds and Patios

    Half of garden frustration is hunting for the trowel you swore was right there. A small, well-organized tool zone can save fifteen minutes every weekend and keep blades sharp for years. You do not need a huge shed — a wall, a bucket, and a couple of hooks will do.

    Wall storage

    Walls are the easiest win for small spaces. Get tools off the floor and into eye-level reach.

    • A pegboard with hooks holds pruners, trowels, gloves, and twine in one glance.
    • French cleats are stronger if you store heavier shovels and hoes.
    • Magnetic strips work great for small metal hand tools.

    Bucket systems

    Daily tool bucket

    Keep one bucket loaded with the tools you grab every visit: pruners, hand trowel, gloves, snips, twine, and a spray bottle. Carry it out, carry it back, no hunting.

    Seed storage

    • Photo storage boxes (4×6) hold seed packets neatly with tabs by category.
    • Add a silica gel packet to keep moisture out.
    • Store the box in a cool, dark drawer — not the garage.

    Seasonal cleanup

    Rust and dull blades cause more tool problems than wear. Twice a year, do a quick service.

    • Wipe blades with a rag and a few drops of mineral oil.
    • Sharpen pruners and shears with a small diamond file.
    • Sand wooden handles smooth, then rub with linseed oil.

    Small-space ideas

    • Hang a vertical garden caddy on the back of a door.
    • Use a single waterproof bin for hoses, splitters, and fittings.
    • Store long tools (rakes, hoes) in a tall trash can in a corner.
    • Label everything — you will not regret it next March.

    Practical tips

    • Hang pruners with a magnet so you can tell at a glance if one is missing.
    • Keep a small first-aid kit in the tool zone.
    • Tape your phone number to the spare key inside the shed for emergencies.

    FAQ

    What is the single best upgrade? A pegboard. Two square feet of wall replaces a chaotic floor pile.

    Where should I keep gloves? Outside the daily tool bucket, but in the same zone, so they air out between uses.

    Conclusion

    Set up your tool zone once, maintain it twice a year, and the system pays you back every weekend. For more time-saving habits, see our 31 gardening hacks pillar.

  • Homemade Pest Control for Garden Plants: Simple, Safer Options

    You do not need a shelf full of chemical sprays to protect a home garden. Most pest problems can be solved with a sharp eye, a soap spray, and a couple of physical barriers. Here is a beginner-friendly playbook that keeps you off the chemical treadmill.

    Identify before treating

    The biggest mistake is spraying first. Spend two minutes inspecting the underside of leaves before you do anything.

    • Tiny clusters under leaves: aphids.
    • Silver trails on leaves: slugs or snails.
    • Holes with ragged edges: caterpillars or beetles.
    • Stippled, dusty look: spider mites.

    Soap spray basics

    A simple insecticidal soap solution kills soft-bodied pests like aphids, mites, and whiteflies on contact and breaks down quickly.

    Recipe

    • 1 quart water
    • 1 teaspoon mild liquid soap (not detergent, not antibacterial)
    • Optional: 1 teaspoon vegetable oil for stickier coverage

    When to spray

    • Spray in the early morning or evening when bees are not active.
    • Hit both sides of the leaves until they are wet but not dripping.
    • Repeat every 3–5 days for two weeks.

    What to avoid

    • Hot midday sun — leaves can burn.
    • Stressed, wilting plants — let them recover first.
    • Open blossoms — protect pollinators by spraying around them.

    Physical pest barriers

    • Row covers: Lightweight fabric over hoops keeps cabbage moths off brassicas.
    • Copper tape: A strip around pots or beds repels slugs.
    • Diatomaceous earth: A dry sprinkle around plants for crawling pests; reapply after rain.
    • Sticky traps: Yellow cards trap whiteflies and fungus gnats indoors and out.

    Practical tips

    • Inspect plants twice a week — early detection is half the battle.
    • Squish small infestations with gloved fingers before reaching for spray.
    • Encourage ladybugs and lacewings by planting alyssum, dill, and yarrow nearby.

    FAQ

    Is neem oil safe? Generally yes, but follow label instructions and avoid spraying when bees are foraging.

    Why are my homemade sprays not working? Most likely you missed the underside of leaves or stopped too soon. Pest control is a routine, not a one-time event.

    Conclusion

    The best pest control is observation plus a small, consistent routine. Pair this guide with our gardening hacks pillar and your plants will spend more time growing and less time recovering.

  • Easy Mulching Tips for Fewer Weeds and Healthier Soil

    Mulch is the closest thing to a magic wand in a home garden. A two-inch layer can cut your watering in half, smother most weeds, and slowly feed the soil as it breaks down. The trick is choosing the right type, applying it at the right depth, and avoiding the mistakes that turn mulch into a problem.

    Why mulch works

    • It blocks sunlight from weed seeds, so most never sprout.
    • It slows evaporation, which keeps roots cool and moist.
    • Organic mulch decomposes into humus, building soil structure year after year.

    Organic mulch options

    Straw

    Light, breathable, and ideal for vegetable beds. Look for straw, not hay — hay can carry weed seeds. One bale covers about 50 square feet at 2 inches deep.

    Wood chips and bark

    Best around trees, shrubs, and perennial beds. They break down slowly and look tidy. Avoid using fresh wood chips around heavy feeders like tomatoes; they tie up nitrogen as they decay.

    • Aged or composted chips are safe everywhere.
    • Pine bark works well in acid-loving beds.
    • Cedar resists pests but can be pricey.

    Leaves and grass clippings

    Free, plentiful, and excellent in vegetable rows. Shred leaves with a mower so they do not mat. Spread grass clippings in thin layers — thick fresh layers can heat up and smell.

    How deep to mulch

    • Vegetables and annuals: 1.5–2 inches.
    • Perennials: 2–3 inches.
    • Trees and shrubs: 3 inches max, never against the trunk.

    Practical tips

    • Wait until the soil warms up in spring before mulching, especially for warm-season crops.
    • Keep a clear ring around stems to prevent rot and rodent damage.
    • Refresh mulch once a year — top up rather than removing the old layer.
    • If weeds break through, your layer is probably too thin. Add another inch.

    FAQ

    Should I use landscape fabric under mulch? In ornamental beds, sometimes. In vegetable beds, no — it blocks worms and roots from soil contact.

    What about rubber mulch? It looks tidy but does not feed the soil and gets very hot in summer. Skip it for plant beds.

    Conclusion

    Mulching is one of the highest-leverage gardening jobs you can do. Get the depth right, leave space around stems, and refresh once a year. Pair it with a smart vegetable watering schedule and you will spend far less time fighting weeds and dragging hoses.

  • How to Use Coffee Grounds in the Garden Without Hurting Plants

    Used coffee grounds are one of the most popular kitchen-to-garden upgrades, but the same Internet that praises them also gets the details wrong. Used right, grounds feed compost and soil. Used wrong, they make a crust that repels water and stresses plants. Here is a clean guide to where coffee grounds help, where they hurt, and how to add them safely.

    Best uses for coffee grounds

    In the compost bin

    • Coffee grounds count as green material, even though they look brown.
    • Mix 1 part grounds with 3 parts dry leaves or shredded paper to keep the pile balanced.
    • Worms love grounds — bins with worms break them down within weeks.

    Mulch limits

    Sprinkle a thin layer (no more than half an inch) over the soil and rake it into the top inch. A thick layer of pure grounds dries into a crust that blocks water.

    • Always mix with bark mulch, leaves, or grass clippings.
    • Reapply lightly once a month rather than dumping a coffee can in one spot.

    Plants to be careful with

    Most studies show fresh grounds (un-brewed) are slightly acidic, while used grounds are close to neutral. The bigger issue is the texture, not the pH.

    • Avoid heavy applications around seedlings — caffeine residue can slow young roots.
    • Tomatoes, blueberries, carrots, and roses generally do well with composted grounds.
    • Skip pure grounds around lawn seed; they crust and reduce germination.

    Practical tips

    • Dry grounds on a tray for a day before storing, or they will mold quickly.
    • Keep a freezer bag of saved grounds; add a handful to the compost weekly.
    • Mix grounds into worm bin bedding for happier worms and faster castings.

    FAQ

    Are coffee grounds good fertilizer? They contain about 2% nitrogen — useful, but not a complete fertilizer. Treat them as a slow soil amendment.

    Can I pour leftover coffee on plants? Yes, diluted 1:1 with water for occasional watering, especially on acid-loving plants.

    Conclusion

    Used coffee grounds are a great free amendment when you mix them in instead of piling them on. Compost first when you can, and never let a thick layer dry in the sun on top of soil. For a wider list of soil shortcuts, see our pillar on gardening hacks that work.

  • 31 Gardening Hacks That Actually Work for Home Gardeners

    Gardening looks effortless when you watch the experts, but most of their results come from a handful of small habits that compound over a season. These 31 gardening hacks are the easy wins — the soil, watering, pest, and tool tricks that save time, money, and plants without any fancy gear.

    Start with soil

    Healthy soil grows healthy plants. Skip the fertilizer sprint and invest in soil structure first.

    Compost shortcuts

    • Toss kitchen scraps directly under mulch — it composts in place and feeds worms.
    • Layer brown (dry leaves) and green (fresh clippings) at a 3:1 ratio for fast hot compost.
    • Crush eggshells before adding to compost so they break down in one season instead of three.

    Mulch timing

    • Mulch after the soil warms up in spring, not before — early mulch keeps soil cold.
    • Two to three inches is the sweet spot. Anything thicker can suffocate roots.
    • Pull mulch a few inches back from plant stems to prevent rot.

    Watering hacks

    Deep watering

    Most beginner gardens are over-watered on the surface and dry underneath. Long, slow soaks once or twice a week beat daily sprinkles.

    • Push your finger 2 inches into the soil — water only when it feels dry.
    • Water at the base in the morning, not on leaves at night.
    • Use upcycled milk jugs with pinholes as slow-drip emitters around tomatoes.

    Rain barrel basics

    • One 50-gallon barrel can capture enough water for a small bed for a week.
    • Cover with mesh to keep mosquitoes out.
    • Use rainwater on acid-loving plants like blueberries and azaleas.

    Pest prevention

    Physical barriers

    • Floating row covers stop most flying pests on lettuce, brassicas, and seedlings.
    • Copper tape around containers deters slugs and snails surprisingly well.
    • Plastic forks tine-up around seedlings keep cats out of fresh beds.

    Companion planting

    • Basil near tomatoes can reduce hornworms.
    • Marigolds throughout the garden deter many soil pests.
    • Nasturtiums act as a sacrificial crop for aphids.

    Tool and container hacks

    • Dip pruners in 70% isopropyl between plants to stop disease spread.
    • Mark your trowel handle with inches in permanent marker for instant planting depth.
    • Crushed terracotta in the bottom of pots improves drainage and reuses broken pots.
    • Keep an old kitchen colander to rinse harvested veggies right at the spigot.

    FAQ

    What is the single most useful hack? Mulching. It saves water, smothers weeds, and feeds the soil as it breaks down.

    Do I need a compost bin? No. A sheet-mulch pile in a back corner works fine for most home gardens.

    Conclusion

    You don’t need expensive tools or rare seeds to grow a great garden — you need consistent, small habits. Pick three hacks from this list and try them this week. Pair them with the right mulching routine and a simple pest plan and you’ll see the difference within a month.